Main GUI
The NGPS GUI is a PyQt5 desktop application that provides all instrument control, target management, and status monitoring in a single window.
Instrument System Status
A colored indicator in the upper-left displays the current state of the instrument. The instrument can only be in one of the following states at a time:
Ready
Not Ready
Starting
Running
Paused
Aborting
Failed
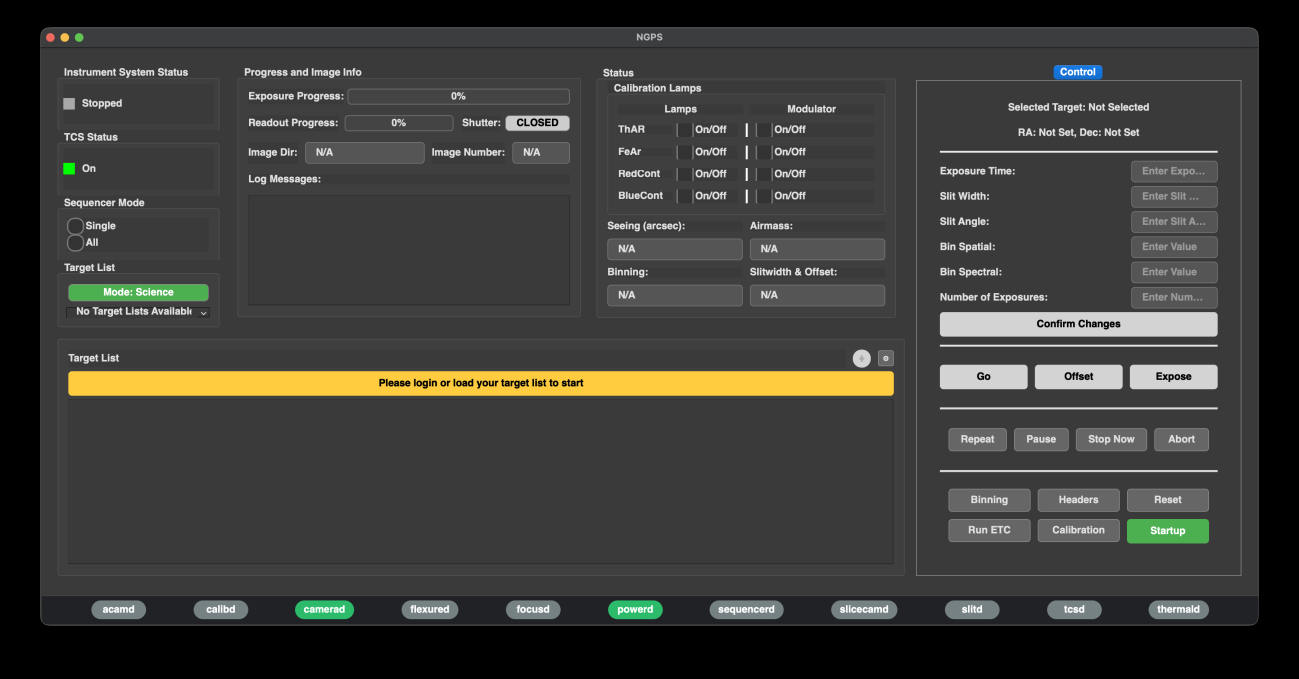
Message Window
A scrollable text area displays key information about what the system is doing. This contains minimal information – intentionally not a continuous stream – so that the observer knows that anything appearing in this window is worth seeing.
Sequencer Mode
A pair of radio buttons labeled Single and All sets what happens after a target is processed. When “all” is selected, all targets in the list will be observed in the order in which they appear. When “one” is selected, a single target observation will be carried out and then the sequencer returns to Ready, waiting for input.
Target List Selection
The Target List selector allows the observer to choose which target list is active. A mode toggle switches between Science and Calibration target list modes. In Science mode, the dropdown loads science target sets. In Calibration mode, it loads specially generated calibration target sets (any target list may contain a calibration target). The dropdown also includes actions for uploading a new target list or creating an empty target list. Before login, the target list area displays a prompt asking the user to log in or load a target list. After login, the GUI shows available target lists for the current user. If no target lists exist, the GUI prompts the user to upload a CSV or create a new empty target list.
Target List Table
The Target List table displays the targets in the selected list. The table supports row selection, sorting, horizontal and vertical scrolling, and full-row selection. Selecting a target updates the control panel with the selected target name, RA, Dec, and observation metadata. The table is read-only during normal use so observers do not accidentally edit fields directly. Changes to exposure time, slit width, slit angle, binning, and number of exposures are made through the control panel and confirmed explicitly. The target list table includes a small + button for adding a target and a gear button for showing or hiding target list columns. Advanced or noisy columns are hidden by default so the observer sees the operationally important fields first.
Progress and Image Info
The Progress and Image Info panel shows the current detector and exposure state.
Exposure Progress shows the percent complete and remaining exposure time.
Readout Progress shows detector readout progress.
Shutter shows whether the shutter is open or closed.
Image Dir shows the current image directory or image name path.
Image Number shows the current image number.
These fields are updated by status messages from the status service, including exposure timing messages, pixel count/readout messages, image number messages, image name messages, and shutter open/close notices.
Calibration and Environmental Status
The status panel includes calibration lamp and modulator state readbacks for:
Lamp Lamp State Modulator State
ThAr On/Off On/Off
FeAr On/Off On/Off
RedCont On/Off On/Off
BlueCont On/Off On/Off
The lamp states are read from powerd status messages, while modulator states are read from calibd status messages. The GUI also displays read-only observing status fields for seeing, airmass, binning, and slit width/offset.
Control Panel
The right-side Control panel is the primary observing command area. At the top, it shows the currently selected target and its RA/Dec. If no target is selected, it displays “Selected Target: Not Selected” and “RA: Not Set, Dec: Not Set.”
The editable observing fields are:
Field Purpose
Exposure Time Sets or overrides the exposure time for the selected target. Slit Width Sets or overrides the slit width.
Slit Angle Sets or overrides the slit angle. Entering PA computes the parallactic angle. Bin Spatial Sets the spatial binning value.
Bin Spectral Sets the spectral binning value.
Number of Exposures Sets the number of exposures for the selected target.
After one or more fields are edited, Confirm Changes becomes enabled. Confirming changes updates to the database and refreshes the selected row in the target table. Once changes are confirmed, the Go button is enabled for the selected target.
Exposure Time Calculator Popup
The ETC popup allows the observer to calculate or solve for exposure-related parameters before applying them to the selected target. It supports fixed exposure time or solve-for-exposure-time modes, fixed slit width or resolution-based modes, channel selection, wavelength range, spatial and spectral binning, extraction aperture, seeing, sky brightness, airmass, target magnitude, AB/Vega system, filter, extended-source mode, and expert arguments. The ETC can run the calculation and then apply the resulting exposure time, resolution, and slit width back to the selected target.
Daemon Status Bar
The bottom status bar displays one status chip per daemon: acamd, calibd, camerad, flexured, focusd, powerd, sequencerd, slicecamd, slitd, tcsd, and thermald.
Each chip uses color to show daemon health:
Color/State Meaning
Green / OK The daemon appears healthy or running. Yellow / Warn The daemon is reporting a warning state.
Red / Error The daemon is reporting an error state. Gray / Unknown The daemon has not reported status or is not found.
The daemon chips are designed to support right-click command menus. The default commands are Ping, Restart, and Open Logs. Some daemons have additional commands, such as Power Cycle for powerd, Resync UDP for camerad, and Reconnect TCS for tcsd.
Auto Acquisition
When selected, the instrument will automatically acquire and guide on your target as soon as the TCS operator signals that it is ready. When this is not used, the sequencer will pause, allowing you time to manually manipulate pointing offsets, etc. You may or may not turn on guiding. The sequencer is on hold until you click continue, at which point the exposure will commence.