Acquisition and Guiding GUIs
ACAM and Slice Viewer GUIs
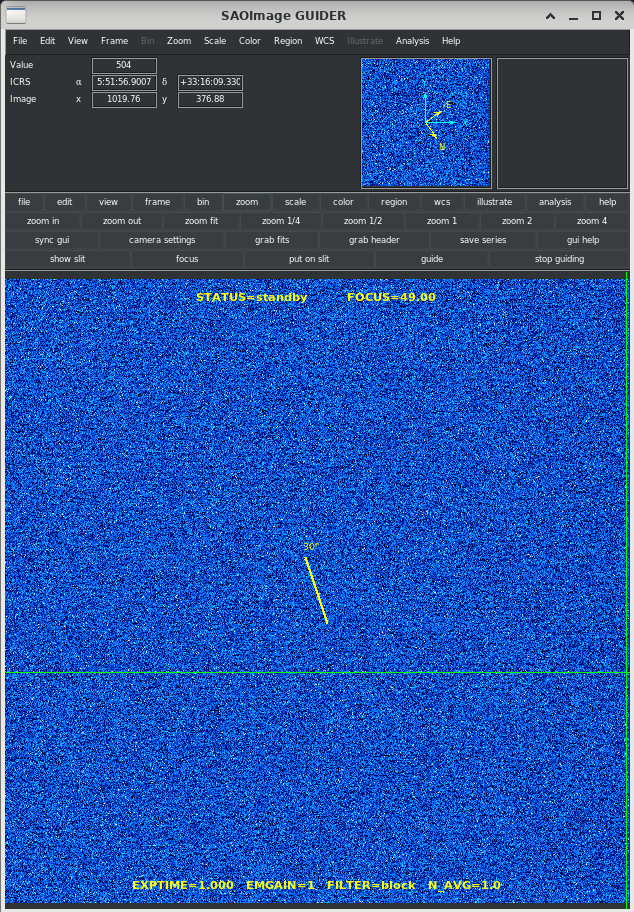
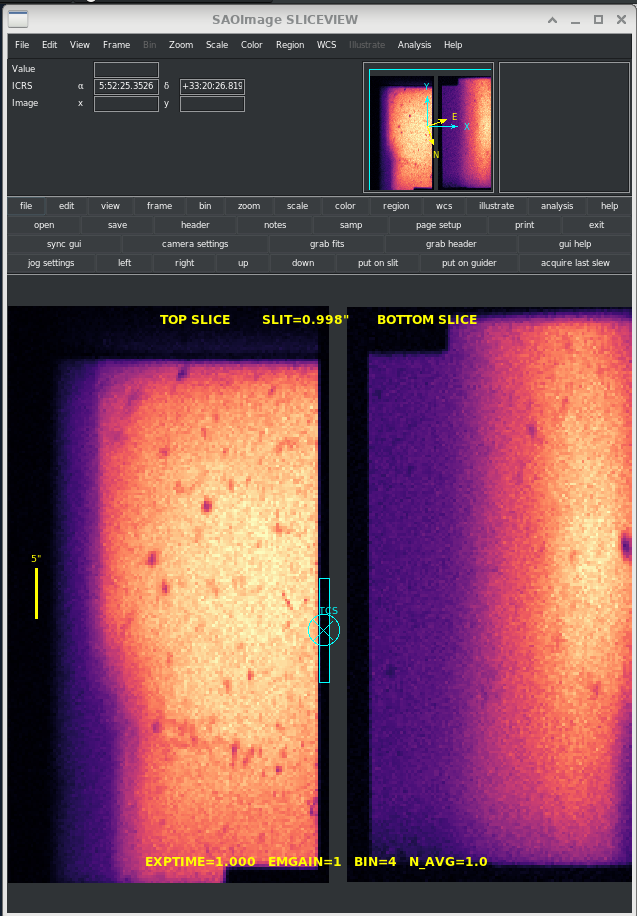
The Acquisition & Guide Camera (ACAM) and the Slice Viewing Cameras (SCAM) have similar GUIs that allow us to monitor what these systems are seeing in real time. A few camera settings can also be adjusted here. The ACAM and SCAM do not require these GUIs to function, so closing or resetting the GUIs will not interrupt the operation of either system. Icons to start or kill the GUIs are found on the desktop:
A kill ds9 GUIs icon is provided in case you lose track of the window locations across multiple VNC desktops or in case a window freezes.
Seasoned astronomers will notice that the GUIs are based on SAOImage ds9, a popular FITS image visualization tool. Most of the familiar ds9 menu bar functions and tools are available, and additional buttons specific to ACAM and SCAM are found on the bottom 2 rows of the button panel. For help using built-in ds9 functionality, please see the ds9 manual. Both GUIs also have a gui help button on the button panel for brief descriptions of the new buttons.

Viewing and working with images
Users are free to change the zoom, scale, and color settings in either GUI to get a better look at objects. However, we do not recommend “working” with images in these GUIs, e.g. adding extra frames, drawing regions, or attempting analysis. This can lead to unpredictable results as the GUIs continuously update with new images. If you find either GUI in a strange display state, try correcting it with sync gui on the button panel. Otherwise, try restarting the GUI (does not affect camera operation).
To work with FITS images, use the grab fits button on either GUI. The SCAM will prompt you to first specify one of the 2 slice cameras. An independent ds9 window will pop up with a copy of the current FITS image, which is also saved to the current data directory under acam/ or slicecam/. Repeated clicks of grab fits will add frames to the new display. You can play with FITS images in this window and use all ds9 functionality without interruption.
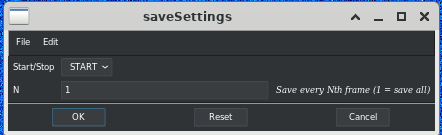
To continuously save FITS images from ACAM, use the save series button. From the pop-up menu, choose an integer N for how often to save (every Nth frame), then select START from the drop-down menu, then click OK. To stop saving images, return to this menu, select STOP from the drop-down, then click OK. Images are saved to /data/YYYYMMDD/acam/.
The grab header button displays the FITS header data for the current image (does not update in real time). To view headers in grabbed images, use File > Header as usual for ds9.
Getting oriented
The upper display sections of the ACAM and SCAM GUIs show the approximate celestial coordinates of the green crosshairs. These are guesses that have not yet been refined by the astrometric solver, thus there may be absolute errors of up to several arcsec. Relative distances and orientations between 2 points in the image are more reliable.
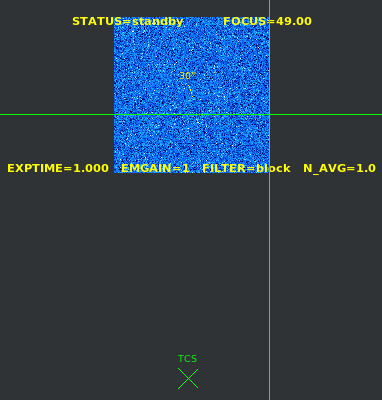
The ACAM field of view (FOV) is offset from the slit by about 8 arcmin, so we do not expect to see our target in the ACAM GUI during typical acquisition and guiding. The 30” scale marker at the image center shows the orientation of the slit but not its true location. The show slit button will zoom out to reveal a marker at the TCS pointing coordinates, which is close to the slit’s true location, well outside the ACAM FOV. To recover the default display, click sync gui.
The SCAM GUI displays a FOV to either side of the slicer. Of course, the physical locations of the slit and slices are somewhere between the 2 images; however, the width and position of the gap between the images is not displayed accurately in this window. Do not trust the displayed gap as a reference for where sources are relative to the slit, e.g. to judge target centering.
A “virtual slit” graphic is displayed to aid manual target acquisition. A scale marker is also displayed on the left.
Changing camera settings
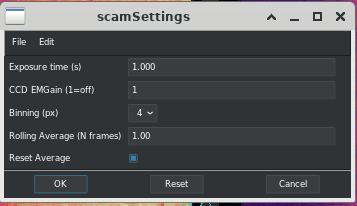
Both GUIs have a camera settings button for changing image acquisition settings on the cameras themselves. Keep in mind that the acquisition and guide functions of NGPS are affected by these settings. For instance, if you increase the ACAM exposure time to get a better look at a faint galaxy, all the stars in the FOV may saturate, making guiding impossible. In other words, the acquisition and guide system is seeing what you’re seeing. You may want to experiment with camera settings if the system is struggling to provide stable guiding. Changing settings while guiding may disrupt guiding.
The camera settings button on either GUI opens a window with options to set the exposure time and the electron multiplying (EM) gain. Rather than displaying each exposure, you can view a Rolling Average of the latest N frames by setting N>1, which can be useful for stabilizing the image in unstable seeing conditions. To reset the averaged image stack, make sure the checkbox is checked before clicking OK.
The Binning option on SCAM sets the cameras’ on-chip binning feature, which can reduce noise and improve clarity. A good default is 4x4 pixel binning since the PSF is large relative to SCAM pixels. After changing binning, click sync gui on the main button panel to reset the zoom for the new pixel scale.
The ACAM Filter drop down menu on ACAM will move the ACAM filter wheel to the selected filter. After clicking OK, it will take several seconds for the wheel to change positions, and you may notice shadows on the images while the wheel is moving. Again, be aware that filter selection will affect the acquisition and guide performance. It also affects measurements of sky conditions (seeing, sky background, extinction) available in telemetry logging since these come from ACAM images.
Focus
The focus button on the ACAM GUI allows for manually changing the focus of the P200 telescope, which affects the focus in ACAM, SCAM, and spectrograph images. Enter a new focus position in the pop-up menu and click OK. An audible “ding” should be heard in the P200 control room when the new focus position is reached.
Manual offsetting
On the SCAM GUI, a set of jog buttons (left, right, up, down) are provided for fast manual adjustment (offsets) of the TCS pointing. If these buttons are used while stably guiding, the system will continue guiding at the resulting position as long as the offsets are kept small (<10”).. By default (unless someone has messed with the ds9 display options), a source on SCAM will appear to move in the direction of the button name, i.e. left will move the source to the left in the image. Sources on ACAM will move slightly differently since the camera orientations are not aligned. Use the scale marker in the ACAM center as a reference for the slit orientation.

Use the jog settings button to adjust the offset size of a single jog button click. The value in arcsec refers to a great circle distance, not a coordinate change, so images should appear to move by the same amount regardless of the original TCS pointing.
We can also use the green crosshairs to move objects to and from the slit. On the SCAM GUI, click the center of your target so that it aligns with the green crosshairs. You may want to zoom in or change other display settings to get more precision. Clicking the put on slit button will offset the TCS to align the target with the SCAM virtual slit marker, which is the correct position before exposing a spectrum. Click the target again and repeat the process as needed to improve alignment with the virtual slit.
There is a similar put on slit button on the ACAM GUI that will offset a target from the ACAM crosshairs to the virtual slit on the SCAM, which will take a few seconds. Once it is visible on SCAM, use SCAM controls to adjust the position further. There is also a put on guider button on SCAM which will offset a target from the SCAM crosshairs to the ACAM (target will appear near the center scale marker). This can be useful for inspecting the local environment of the target using the larger ACAM FOV.
Note that the jog buttons and “put on slit” buttons use open loop TCS offsets, which are not precise. Do not expect perfect, repeatable motions, and do not use these buttons for quantitative analysis.
Manual guiding and acquisition
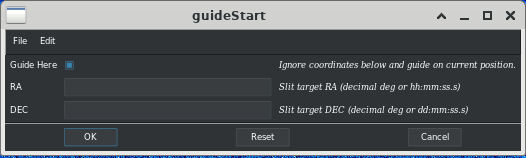
The user can manually initiate guiding using the guide button on ACAM. This will pop up a menu:
The simplest option is to check the Guide Here box. After clicking OK, the ACAM system will enter guide mode, attempting to stabilize the current pointing using the ACAM FOV as a reference. The RA and DEC fields will be ignored.
With the box unchecked, the system will attempt to acquire the target (put it on the slit) specified by RA and DEC. Coordinates may be specified in decimal degrees, or HH:MM:SS.s format. The TCS pointing will be changed via offsetting, not slewing, so it does not require operator approval. The target must be within the offsetting range of the current TCS pointing (<6000”). After successful acquisition, the ACAM will switch to guiding mode.
Remember that the TCS slew coordinates are not the same as the coordinates of the target to be acquired. There is an offset between the slit and the TCS that is already accounted for when sending coordinates to the operator via the main NGPS GUI. When a target is properly centered on the slit, it would be incorrect to record the RA and DEC of the TCS and enter them in the ACAM guide menu, expecting to re-acquire the target.
A convenient feature is the acquire last slew button on SCAM. This will first reset the TCS pointing to the last coordinates that the operator used to slew (does nothing if the slew has just completed). Then guiding will begin in that position. This mode assumes the last slew intended to put a target on the slit. It tries to match the slit to the intended target coordinates rather than match the TCS pointing to the slew coordinates.
Stop guiding at any time by clicking stop guiding on the ACAM button panel. Remember that the SCAM jog buttons can be used to adjust pointing without interrupting guiding.
Troubleshooting
The status of the Acquisition and Guide system is displayed at the top of the ACAM image as either “STANDBY”, “ACQUIRING”, or “GUIDING”. In poor observing conditions, the system may consistently or intermittently drop into the “STANDBY” state, meaning it is failing to obtain decent images for guiding. Acquisition and guiding is performed by continuously finding an astrometric solution to the ACAM FOV, not by tracking individual stars. ACAM requires a minimum of 4 stars (good signal to noise, unsaturated) in its FOV. More is typically better, unless there happens to be a large, bright stellar cluster in the FOV.
Steps you can take to improve A&G performance:
Increase the ACAM exposure time to boost the number of detectable stars. This also slows
down the guiding feedback loop.
Increase the ACAM Rolling Average to an integer > 1. This is useful when unstable seeing
causes sources to appear to bounce around.
Change the ACAM filter. Although the “clear” filter will have the largest PSF, it may have the
best SNR in poor observing conditions. The “r” filter is the recommended default.
Change the slit angle (a.k.a. change the P200 CASS angle), which will change what stars are
visible in the ACAM field. If this is done via the Target List’s slit angle value, the pointing coordinates transmitted to the P200 will be adjusted to keep the target on the slit. A 180º rotation is a natural first choice given the symmetry of the slit, but any angle may help.
If guiding is severely unstable, it may be preferable to skip guiding completely and rely on the
P200 tracking stability (do nothing). Try using the crosshairs or grab fits features on the ACAM or SCAM GUI to monitor long term drift. If you notice a drift, use the SCAM jog buttons to manually correct the pointing.
Remember that any changes made to camera setting may need to be reset once conditions improve,
On-Target GUI
A small, one-button indicator GUI runs on a separate VNC desktop that is intended solely for use by the TCS operator. Policy decisions require a human to point the telescope and inform NGPS when the telescope is on target. “On target” does not simply indicate that the telescope is pointed at the requested coordinates; rather, on target specifically means “ready to observe” and includes factors which currently have no source of remote telemetry including dome shutter in correct position, etc.
Although NGPS automatically sends the target coordinates to the TCS, the TCS Operator must perform the actual move; the instrument control software merely provides the coordinates. The expected policy for NGPS to achieve the best possible throughput is that whenever the TCS operator receives coordinates, they are to immediately initiate the slew. After NGPS requests a telescope slew, it signals the On Target GUI to activate its button, and the observing sequence is in a holding pattern until the TCS operator makes the determination that the telescope is on target and ready to observe. Once the TCS Operator clicks on the on-target button, a signal is sent to NGPS allowing it to continue; the on-target button deactivates until the next slew request.